

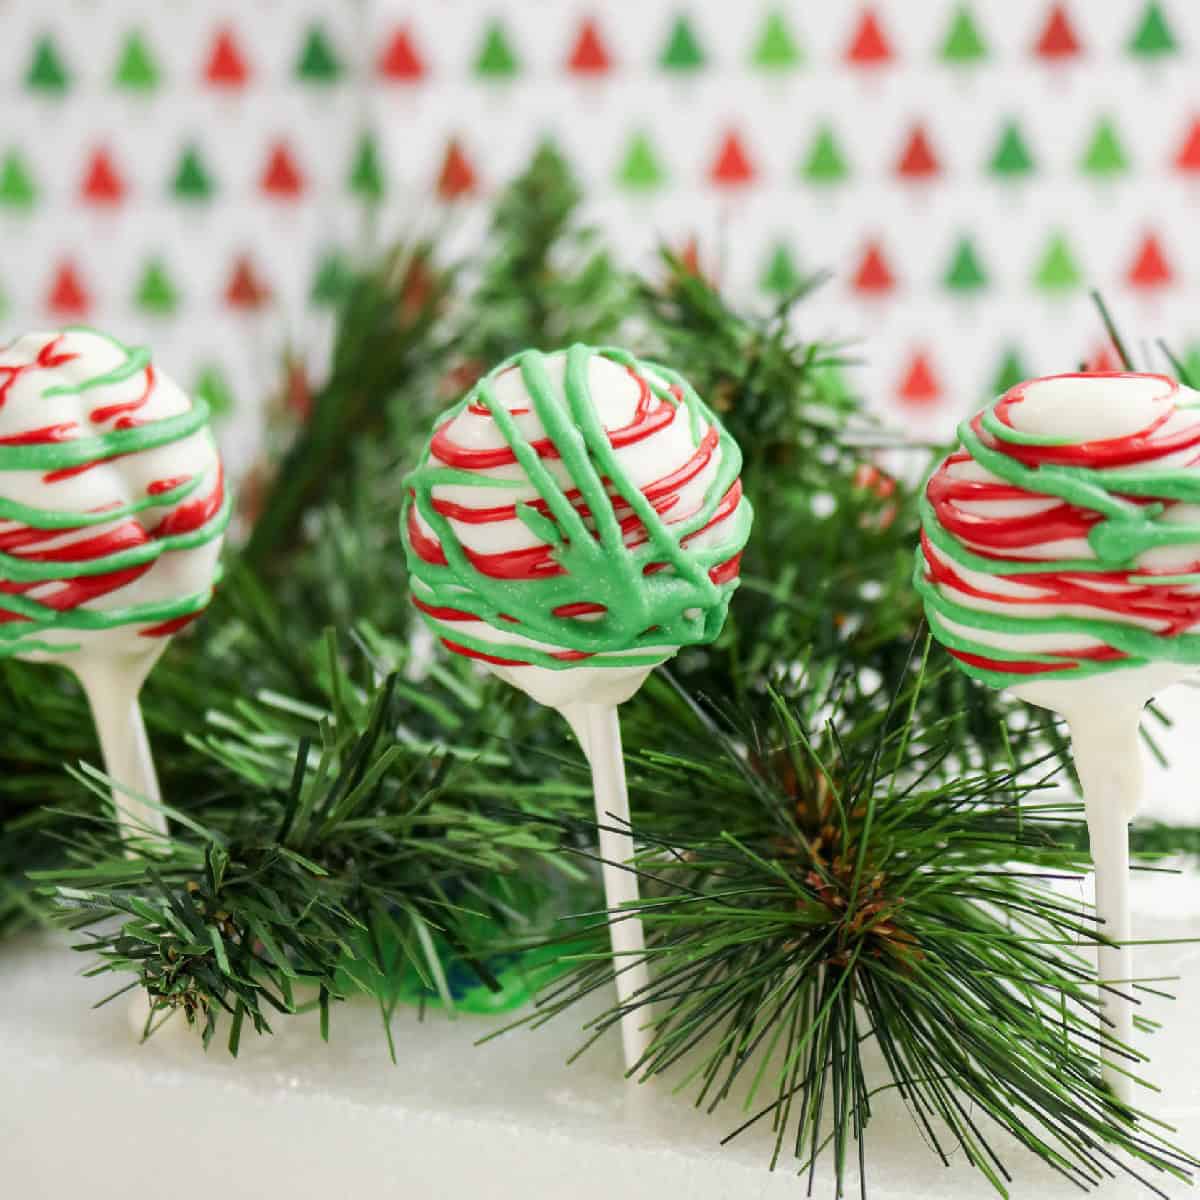
These Christmas cake pops are one of those holiday treats that instantly make everything feel more festive. They're sweet, bite-sized, and perfect for sharing at parties, cookie exchanges, or cozy family gatherings.
Jump To
- Ingredients for Christmas Cake Pops
- How to Make Christmas Cake Pops
- Pro Tips for Perfect Christmas Cake Pops
- How to Store and Freeze Christmas Cake Pops
- Delicious Christmas Cake Pop Variations
- What to Serve with Christmas Cake Pops
- Final Thoughts
- FAQ
- Classic Christmas Cake Pops Recipe Everyone Loves
- YOU MAY ALSO LIKE
I love how easy they are to customize with holiday colors, sprinkles, and simple decorations that still look impressive. If you're looking for a fun Christmas dessert that everyone loves, these cake pops are always a hit.
Ingredients for Christmas Cake Pops
You only need a handful of simple ingredients to make these festive Christmas cake pops, and each one plays an important role in creating that classic sweet, creamy bite everyone loves.

Leftover cake scraps: This is a great way to use up extra cake. Any flavor works, and crumbling it finely helps the cake pops hold together smoothly.
Frosting: Buttercream or cream cheese frosting adds moisture and binds the cake crumbs into a soft, dough-like texture that's easy to shape.
Candy melts or white chocolate: These create the smooth outer coating and give your cake pops that polished, bakery-style finish. Holiday colors make them extra festive.
Lollipop sticks: These turn your cake pops into easy, handheld treats, perfect for parties, gifting, and holiday dessert tables.
Holiday sprinkles or crushed peppermint: This is where the fun comes in. Sprinkles, peppermint, or a simple drizzle add color, texture, and that extra Christmas touch everyone notices.
How to Make Christmas Cake Pops
These easy Christmas cake pops come together step by step, and the process is just as fun as the decorating at the end.


Mix the cake base: In a large bowl, combine the cake crumbs and frosting. Mix until the texture feels like cookie dough and holds together easily when pressed.
Shape the cake balls: Roll the mixture into 1-inch balls and place them on a parchment-lined baking sheet. Chill in the refrigerator for 1 hour, or freeze for about 20 minutes, until firm.


Melt the coating: Follow the package instructions for the candy melts or chocolate, stirring until smooth and glossy.
Insert the sticks: Dip the tip of each lollipop stick into the melted coating, then insert it halfway into a cake ball. This helps secure the stick and prevents slipping.


Dip the cake pops: Carefully dip each cake pop into the melted coating, gently tapping to remove excess for a smooth finish.
Decorate right away: While the coating is still wet, add sprinkles, crushed peppermint, or drizzle with a contrasting candy melt for a festive look.
Let them set: Place the cake pops upright in a styrofoam block or foam board and let them sit until completely firm before serving or storing.

Pro Tips for Perfect Christmas Cake Pops
A few thoughtful tips can help your Christmas cake pops turn out smooth, sturdy, and beautifully coated every time.
Make sure the cake crumbs are very finely crumbled so the texture stays even when mixed with frosting. Start with a small amount of frosting and add more only if needed, since too much can make the cake pops oily and hard to dip.
Chilling the cake balls before dipping is key; it helps them hold their shape and prevents them from falling apart. When dipping, tap gently to remove excess coating, and decorate right away so the toppings stick before the coating sets.

How to Store and Freeze Christmas Cake Pops
Storing Christmas cake pops properly helps keep them fresh, firm, and party-ready.
Once fully set, place the cake pops in an airtight container and store them in the refrigerator for up to five days. Lining the container with parchment paper helps prevent sticking, especially if you're stacking them.
For short periods, cake pops can sit at room temperature for a few hours as long as the coating is completely firm. Reheating isn't necessary, just let refrigerated cake pops sit out for about 10 to 15 minutes before serving so they soften slightly.
If you want to make them ahead, you can also freeze Christmas cake pops. Once decorated and fully set, store them in a freezer-safe, airtight container for up to six weeks. Thaw overnight in the refrigerator, then bring to room temperature before serving.

Delicious Christmas Cake Pop Variations
One of the best things about Christmas cake pops is how easy they are to customize.
You can use chocolate cake with peppermint-flavored frosting for a classic holiday twist, or red velvet cake with cream cheese frosting for a festive look. Switching the coating to milk or dark chocolate changes the flavor while keeping the same easy process.
You can also add a small amount of vanilla, almond, or peppermint extract to the frosting to give the cake pops a subtle flavor boost. Different sprinkles and colors make this recipe easy to adapt for other seasons or celebrations, too.

What to Serve with Christmas Cake Pops
Pairing Christmas cake pops with the right treats turns them into part of a cozy holiday spread.
They pair especially well with warm drinks such as hot cocoa, peppermint mochas, or a simple cup of coffee. Adding them to a dessert board alongside cookies, brownies, and fudge makes an inviting presentation for parties.
Fresh fruit, such as strawberries or grapes, can help balance the sweetness. These cake pops also fit perfectly into cookie exchanges or holiday dessert tables where small, handheld treats shine.

Final Thoughts
These Christmas cake pops are a fun, festive, and easy holiday treat. They're great for using up leftover cake, decorating with family, and sharing at parties or cookie exchanges.
With endless options for flavors, colors, and toppings, you can easily customize them for any holiday theme.

FAQ
Almost any cake works well, which makes this recipe great for using leftovers. Chocolate, vanilla, or even birthday cake scraps all hold together nicely when mixed with frosting. If you're starting from scratch, a simple cake mix works well and keeps things simple.
Cracks usually happen when the cake balls are too cold, and the melted chocolate or candy coating is too warm. Letting the cake pops sit at room temperature for a few minutes before dipping helps everything settle and keeps the coating smooth and neat.
Absolutely. Reindeer cake pops are a fun and festive option, especially for kids. With a few simple decorations like candy eyes and pretzel antlers, you can easily transform regular cake pops into adorable holiday treats that fit right in with your dessert table.
You can. If you prefer, roll the mixture into balls and serve them as cake truffles instead. They still taste the same and work well when you want a simple option that's easy to place on a dessert platter.
Classic Christmas Cake Pops Recipe Everyone Loves
Ingredients
- 2 cups leftover cake scraps any flavor, crumbled finely
- ¼ cup frosting buttercream or cream cheese
- 6 oz candy melts or white chocolate red, green, or white
- 12 lollipop sticks
- Holiday sprinkles crushed peppermint, or drizzle for decorating
Instructions
- Mix the cake base: In a large bowl, combine the cake crumbs and frosting. Mix until the texture feels like cookie dough and holds together easily when pressed.
- Shape the cake balls: Roll the mixture into 1-inch balls and place them on a parchment-lined baking sheet. Chill in the refrigerator for 1 hour, or freeze for about 20 minutes, until firm.
- Melt the coating: Follow the package instructions for the candy melts or chocolate, stirring until smooth and glossy.
- Insert the sticks: Dip the tip of each lollipop stick into the melted coating, then insert it halfway into a cake ball. This helps secure the stick and prevents slipping.
- Dip the cake pops: Carefully dip each cake pop into the melted coating, gently tapping to remove excess for a smooth finish.
- Decorate right away: While the coating is still wet, add sprinkles, crushed peppermint, or drizzle with a contrasting candy melt for a festive look.
- Let them set: Place the cake pops upright in a styrofoam block or foam board and let them sit until completely firm before serving or storing.

Leave a Reply